Imagine you have an important document to print and as soon as you send a print command to your printer, you are welcomed with an error message ‘Windows cannot connect to the printer’.
Normally, Windows automatically connects to the printer that is on the same network as your PC. But sometimes connecting your printer to the computer is easier said than done. In most of the cases, using the ‘Add a printer or scanner’ wizard or ‘Running the Troubleshooter’ fixes the issue, but if it doesn’t, you can take the help of the troubleshooting methods explained below:
Solutions To Fix ‘Can’t Connect to Printer’ Error
1. Check Printer’s Compatibility
It may happen that your printer is not compatible with the Windows version you have installed. Some printers may not work with Windows 10, so you need to ensure that if your printer falls in this category. Here is how to check the compatibility:
- Go to the Control Panel via the Start menu and then click on Hardware and Sound.
- Upon clicking Devices and Printers, a list of devices and printers will appear.
- Then check under the ‘Unspecified’ section if your printer name is there.
2. Update Windows
Keeping your Windows updated is the best way to ensure the smooth functioning of your device. By installing the latest update, you get to work with the latest and improved system software and drivers. One of the reasons for which windows cannot connect to the printer can be using outdated to corrupted versions of useful software or drivers or printer driver is not installed.
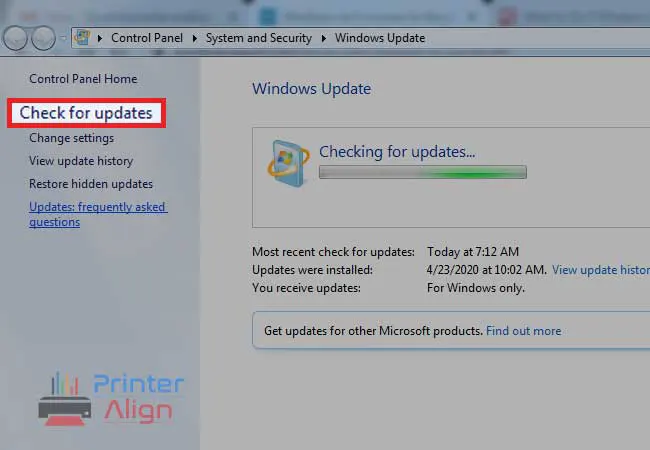
To check and install Windows updates, here is what you need to do:
- Open the Start menu and type Windows Updates in the search box.
- From the search results, click on Windows Updates.
- Further, click on ‘Check for Updates’ in the left columns.
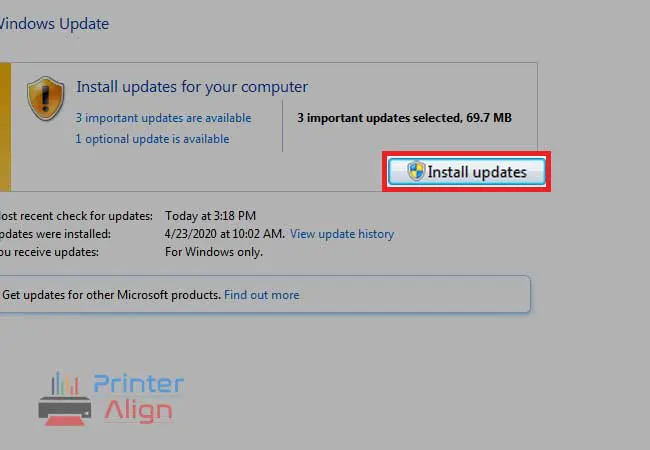
- Click on ‘Install Updates’ to get the latest software patches and drivers installed on your device.
3. Restart Printer Spooler
The print spooler files may also create an issue in letting your printer connect to your device. So, you have to delete the spooler files and then restart the service.
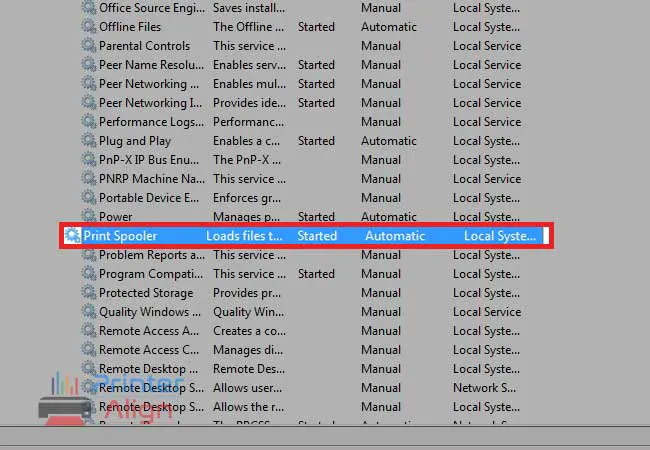
- In the Start menu, type Services, and from the search results, click on the Services option.
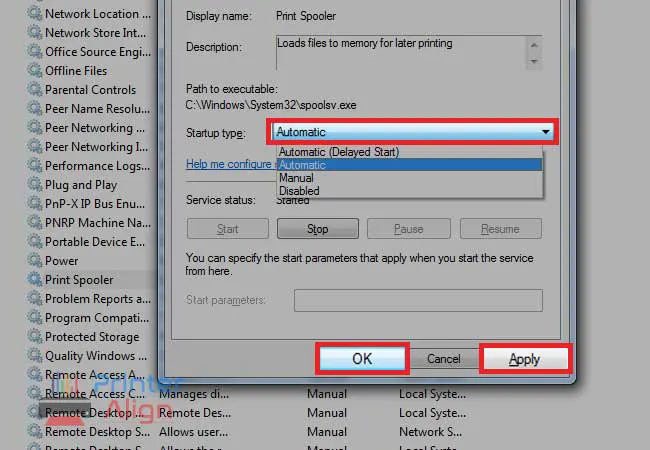
- In the Services window, double-click on the option ‘Print Spooler’.
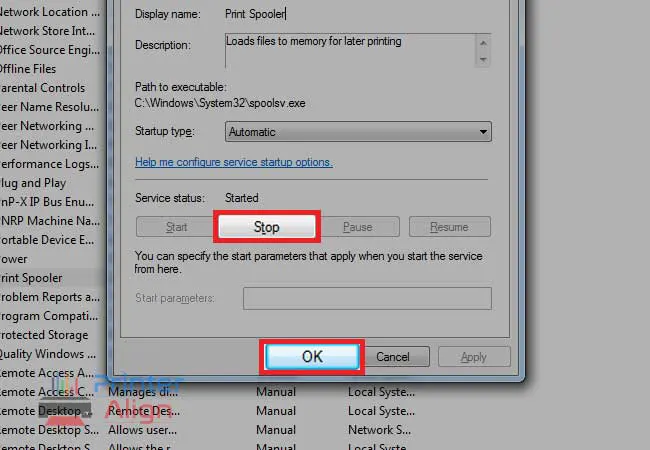
- Click on ‘Stop’ and then click ‘Ok’ to stop the spooler service.
- Once you have disabled the service, now go back to the search box and type
%WINDIR%system32spoolprinters - Select the folder and open it with the help of admin privileges, after that delete all the contents of the folder.
- Again double-click on the ‘Print Spooler’ option in the Services window.
- Click on ‘Start’ and in the ‘Startup Type’, select ‘Automatic’. After that, click ‘Apply’ and then hit ‘Ok’.
4. Check Default Printer’s Settings
If your computer doesn’t recognize your printer, you need to ensure that the printer you are trying to connect is set as default. It may happen that the printer keeps changing its default position, therefore is not connecting to your device. You can always change the default printer from the settings of your Windows as follows:
- Click on the Start menu icon and then go to Settings
- Choose ‘Devices’ and then click on the ‘Printers and Scanners’ option provided in the left column.
- Navigate to the option that says ‘Let Windows manage my default printer’ and turn the option off.
There you go- now Windows will no longer interfere with your default printer settings.
5. Find a Connected printer
You have connected your printer but still it is not showing up. With Windows 10, whenever you connect the Ethernet cable or connect the printer to a wireless network, in most of the cases, the printer automatically shows up in the list of installed devices.
But if it doesn’t appear in the list of installed devices; open the ‘Add a printer’ wizard from the ‘Printers and Scanners’ section of the Control Panel. Click on ‘Add a printer or scanner’ and Windows will start
searching for connected printers and will provide the results in the list. Click on the printer you want to connect and then select ‘Add Device’.
6. Update the Printer Driver
You must keep on updating the drivers of your printer so that it matches with your new operating system. Drivers are important for the proper functioning of printers and if you have recently updated to Windows 10 and your computer is unable to find your printer, it may be because the drivers you have installed have gone outdated.
Moreover, if your system has face a virus attack recently, it may be possible that the drivers have been damaged. Here are the three ways using which you can update printer drivers:
- Windows Update- Windows always offers updates for the software and drivers installed on your device. So to get the latest patch for your driver, go to Device Manager on your device and expand the list of devices in the Printers section. Right-click on your device and then select Update Driver. Next, choose the option ‘Search Automatically’ to let Windows search for the update and install it.
- Manually- If Windows doesn’t find the latest driver for your printer, you can visit the manufacturer’s website to get the updated version for your printer’s driver.
- Installation Disc- If you have received an installation disc with your printer, check that for the software for installing the driver.
7. Troubleshoot the Missing Printer
Sometimes a printer doesn’t install smoothly as it should. Call it bad luck or lack of technical know-how, even after connecting the printer; it may not appear in the list of available printers.
First of all, ensure that the printer is on and connected to the same network as the computer. Also, ensure that print sharing is enabled on the PC to which the printer is connected. If clicking on the option ‘The printer that I want isn’t listed’ doesn’t work for you, you can run the troubleshooter.
To run the troubleshooter, you printer that is having connection issues must be there in the available devices list. Click on your printer from the list and then click on ‘Manage’. The ‘Manage your Device’ panel will appear for that printer, from the options at the bottom, click on ‘Run the Troubleshooter’. Windows will start searching for issues and if it detects one, another
dialog box will show the problem and, depending on the issue, you can click on any one of the options ‘Apply this fix’ or ‘Skip this fix’.
8. Allow Printer Sharing on Firewal
It is also possible that Windows Firewall prevents the connection and that is why there is a problem in establishing the connection of your printer. You need to ensure that File and Printer sharing is allowed by Windows Firewall or you can follow the given steps to enable it:
- Click on the Windows icon and go to Control Panel from the Start menu.
- Select Windows Firewall from the Control Panel, and then click on Exceptions.
- Make sure that the File and Printer Sharing checkbox is selected to ensure that the application is not blocking the connection.
9. Disable the Antivirus
If you have an antivirus program installed on your device, it is possible that it is blocking the connection and not letting your laptop find your printer. To check this, you can temporarily disable the antivirus and then check if you are able to establish the connection between the printer and the system.
Also, remember that if it fixes the issue, make sure to enable the antivirus immediately to ensure the safety of your device.
10. Use other options to Add your Printer
If you see the ‘Find a printer by other options’ dialog box; you will get five ways to connect to your printer.
- My printer is a little older. Help me find it: Choose this option to let Windows perform another search. If it finds your printer, select your printer, and then Windows will install the drivers.
- Select a printer by name: You must know the name of the computer to which the printer is connected and the name of the network to use this option.
- Add a printer using a TCP/IP address or hostname: When you choose this option, the ‘Type a printer hostname or IP address’ dialog box will appear. Next, enter the address or hostname, and hit ‘Next’. On a home network, you can get IP address from the control panel by printing a status report. Windows provide a list of compatible devices, and you can select your printer by the manufacturer and then click ‘Next’.
- Add a Bluetooth, wireless, or network discoverable printer: This option lets you add peer-to-peer network devices that are not on your LAN.
- Add a local printer or network with manual settings: You can choose this option to manually create a printer port and install the printer; however, this will require some sort of technical expertise.
Hopefully this guide will help you in diagnosing and fixing the issues due to which your printer is not connecting to the computer.